Video & Sound Production: Lecture and Exercise

24/4/2024 - 26/7/2024  (Week 1 - Week 14)

Lim Yu Xuen / 0359676

Video and Sound Production / Bachelor of Design (Hons) in Creative Media / Taylor's University

Video & Sound Production: Lecture & Exercise


TABLE OF CONTENTS

✿ Lectures


INSTRUCTIONS

Figure 1.1 Module Information


LECTURES

Week 1
Module Briefing


Week 2
Framing & Storyboard


Week 3
Project 1 Exercise 1: Audio Dubbing


Week 9
Audio Editing


WEEKLY EXERCISES

W1: Editing Exercise 1: Mints

We were tasked to download videos from the google drive link provided by Mr Matin. We have to edit the scenes accordingly to form a complete video. Adobe Premiere Pro was required.

Figure 2.1 Mints Footages 

Figure 2.2 Progress of editing

I imported the footages into Adobe Premiere Pro and edited the scenes accordingly to form a complete video. I arranged the scenes accordingly and exported the final video which is linked below.

Figure 2.3 Final Mints Video


W1: Editing Exercise 1: Doritos

For the second exercise, we had to download more footages in the google drink link provided by Mr Martin. However, the scenes are not titled accordingly, hence we have to re-arrange them in the correct order. 

Figure 2.4 Doritos Footages

Figure 2.5 Progress of editing

I imported the footages into Adobe Premiere Pro and edited the scenes accordingly to form a complete video. I arranged the scenes accordingly and exported the final video which is linked below. Besides that, I referenced the original video from YouTube which eased the process of completing the edits.

Figure 2.6 Final Doritos Video


W2: Asynchronous class materials reflection

In this week's asynchronous class materials, I explored storytelling and the Three-Act story structure. This classic framework divides a narrative into three distinct parts: setup, confrontation, and resolution.

In Act One, the story introduces the protagonist, their environment, and an inciting incident that disrupts their normal life, prompting them to act. This initial setup is essential for engaging the audience and propelling the narrative forward.

Act Two, the confrontation, is the longest segment where the protagonist encounters increasing obstacles. This act is divided into phases of progress and setbacks, which deepen the protagonist's character and advance the plot. A major crisis at the end of Act Two forces the protagonist to reassess their strategy, paving the way for the final act.

Act Three, the resolution, culminates in the story's climax, where the protagonist faces and overcomes their greatest challenge. This peak is followed by the denouement, which resolves the story and wraps up the protagonist's journey. The enduring appeal of the three-act structure lies in its ability to craft engaging and well-organized narratives that resonate with audiences.


W2: Filming and Storyboard Exercise

Video 1: "Christmas Advert" by John Lewis

We were instructed to watch a video provided by Mr Martin, it is called "Christmas Advert" by John Lewis. We also learnt about the different shot sizes during our lectures. After watching the video, we need to name the shot sizes from the scenes.

Shot sizes:
  • Medium Close Up Shot: Captures the boy from head to shoulders, focus on his actions
  • Wide Shot: Shows the boy and the scene - the bedroom
  • Medium Shot: A natural shot that captures the boy from head to upper body, no white space left
  • Full Shot: Captures the boy's full body and his actions
Figure 2.7 Different Shot Sizes

  • Over The Shoulder Shot: Shows the subject from behind the shoulder of another person. It does not always reflect "having a shoulder" in the shoot. The main aim is to present the point of view from the foreground's perspective
Figure 2.8 Over The Shoulder Shot

NOTE: The bottom right shot features the mother in a soft foreground, but this is not an Over The Shoulder Shot. This is because the scene does not show that it is taken from anyone shoulder's perspective. This shot captures the boy in the middle, without capturing any perspective. This scene is a wide shot.


Video 2: "The Unsung Hero - Thai Life Insurance Ad"

Next, we were tasked to watch a second video named "The Unsung Hero - Thai Life Insurance". We have to name all the shot sizes that were selected by Mr Martin.


Figure 2.9 Different Shot Sizes


W2: Shot size, camera angle, and composition (Quiz)

After learning about shot sizes, we were tasked to do a quiz through google forms. 

Figure 2.10 Quiz Results


W2: Research

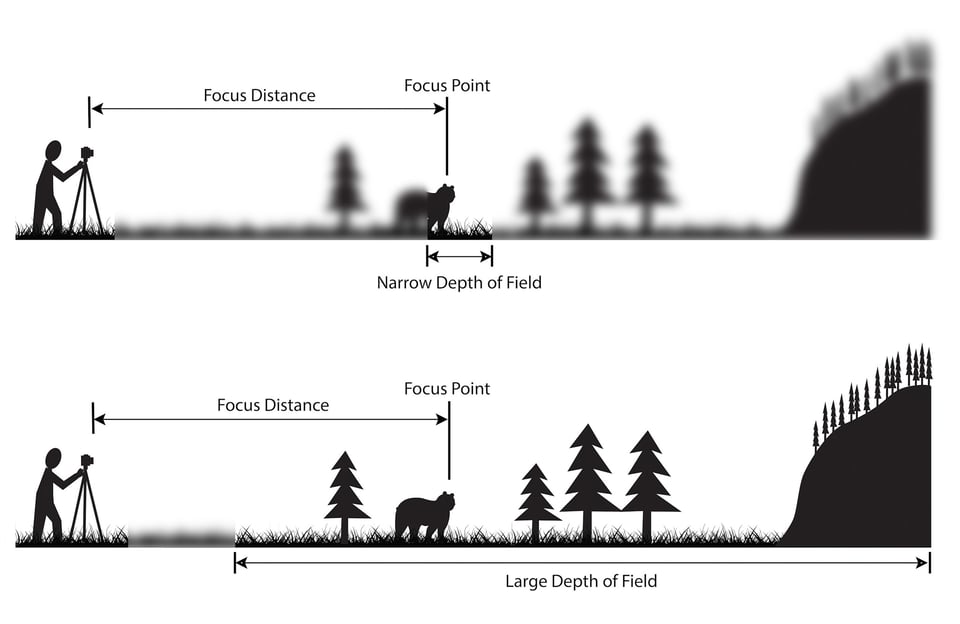
Research on "Depth of Field"

What are the foreground, midground, and background in composition?
  • Composition refers to the arrangement of visual elements within a shot or frame. A good composition, incorporating foreground, midground, and background, adds visual interest by creating depth and dimension, convey a sense of movement and rhythm.
  • Foreground- Object that is nearest to the viewer
  • Midground- Objects in between foreground and background
  • Background- Object furthest away from the viewer
The image below shows depth within the image, the rocks serve as the foreground, the water as the midground, and the sky and bridge as the background.

Figure 2.11 Depth of Field Photo Example

What is Depth of Field?
Depth of field is the distance between the closest and farthest objects in a photo that appears acceptably sharp. Now your camera can only focus sharply at one point. But the transition from sharp to unsharp is gradual, and the term ‘acceptably sharp’ is a loose one! Without getting too technical, how you will be viewing the image, and at what size you will be looking at it are factors that contribute to how acceptably sharp an image is. It also depends on how good your vision is! The circle of confusion - the gradual transition between sharp and blur.

DoF sketch
Figure 2.12 Depth of Field

Deep depth of field vs Shallow depth of field
Deep depth of field is a larger area in focus, as it keeps more of the image sharp and clear. It is sometimes referred to a large depth of field, because it has a larger field of view in focus. Shallow depth of field is the small or narrow area in an image that is in focus. The background is often blurred while only the subject stays in focus.

Figure 2.13 Examples to compare between deep and shallow depth of field


Research on "180 Degree Rule (Static Screen Direction)"

What is a screen direction?
Screen direction (camera direction), is the direction that characters and objects move in the scene within the frame. Consistent screen direction is important in visual storytelling because it often tells the viewer where a character is going and when the character changes direction.

What is a 180 degree rule?
The camera should be kept on one side of an imaginary axis between two characters. Hence, the first character is always framed on the right of the second character. It is the fundamental guide to maintain visual coherence.

Static screen direction VS Dynamic screen direction:
Static shots are camera setups where the camera remains stationary, capturing a scene without significant movement, often evoke a sense of contemplation, stability, and intimacy. Dynamic shots involve camera movement, adding energy and visual dynamism to a scene, provoke various emotions and intensifying storytelling.

What is continuity in cinematography?
Continuity editing uses a variety of classic film editing techniques to blend multiple camera shots — some taken at different times or even different locations, into a seamless consistent narrative.


W2: Shooting Exercise (Framing)

We were tasked with capturing eight different shot sizes according to the intructions provided by Mr Martin. I was grouped with a new friend, and started to work on capturing the scenes around campus during our practical class. Throughout the class, I asked Mr Martin for feedback on the shots and had to re-take a few, but in the end, all the shots were approved and ready to be edited. The instructions are provided below.


Figure 2.14 Instructions

All the videos captured by my friend are arranged and saved in my albums neatly.

Figure 2.15 Videos for Shooting Exercise

Figure 2.16 Files Renamed

Figure 2.17 Progress of Editing

Figure 2.18 Final Shooting Exercise Video


W2: Editing Exercise 03 (Lalin)

We were tasked to edit a video using the footages from the google drive link provided by Mr Martin. The footages provided are RAW takes by our seniors. We have to edit the video into 35 seconds and ensure smooth transition from one scene to another. The original video is the short film "Short Film Iklan Thailand: LALIN". After watching the video and tutorials, I downloaded all the footages and started my editing process.

Figure 2.19 Materials renamed

Figure 2.20 Screenshot of the video editing progress

Figure 2.21 Final Video - Lalin Editing


W2: Three-Act Story structure (Quiz)

After full understanding the three act structures, we were tasked to complete a quiz to test our understanding.

Figure 2.22 Quiz Results


W2: Three-Act Story structure (Explain)

Summary: It keeps your beginning separate from your middle and your middle separate from your end. It is a narrative model that divides stories into three parts — Act One, Act Two, and Act Three, or rather, a beginning, middle, and end.

Reading Materials Provided by Mr Martin:

Act 1 —  Setup: Exposition, inciting incident, plot point one
Act 2 —  Confrontation: Rising action, midpoint, plot point two
Act 3 —  Resolution: Pre climax, climax, conclusion 

3 Act Story Structure for RPG Scenario Design - Steven's Balagan
Figure 2.23 The Three-Act Structure

1: Short Film iklan Thailand: LALIN

Act One: The scene begins when the female protagonist (Lalin) introduces herself at the start. She faces challenges becoming a net idol. The male protagonist is then introduced (Nut). He contacts Lalin, and the two started online dating. The plot point 1 is both of them started dating.

Act Two: Nut is in Japan, and requests a face-to-face meet-up with Lalin. Lalin refuses to meet him, but she read the book given by Nut. It includes flashbacks and memories of their first encounter.

Act Three: In this scene, Lalin was running away, chasing after Nut. There were glimpses into both protagonists' perspectives. However, they did not met up in the end.

Inciting Incident: Nut, who knows Lalin before she became a net idol, recognises the true version of her beyond the edited images.

Midpoint scene: Nut asked to meet Lalin face-to-face, but she refuses to meet him because her insecurities was taking over her mindset, she worries about her appearance.

Climax scene: Lalin found out that Nut was the fat guy she met before, and that he have already saw her face before. Besides that, the book written by Nut created flashbacks for Lalin. Lalin feels touched.

The theme of the short film is about identity and self acceptance. It reminds us to accept ourselves and reminds us that people who appreciate and love us will also accept us for who we truly are, no matter what.

2: Everything, Everywhere, All At Once

Act One: The main character was introduced, Evelyn. As seen, she is struggling for a living, going through conflicts with her own family. The second protagonist is Waymond, he is the husband of Evelyn and also an alternate version of Waymond from a parallel universes. Plot point 1 is Evelyn can communicate in different versions of herself from multiple parallel universe.

Act Two: Evelyn discovers that she has powers where she can use in different parallel universes. She navigates through different universes while trying to save the multiverse and her family. Evelyn is also going through a serious conflict with her daughter, Joy.

Act Three: Evelyn faces different challenges across the universe, she had to resolve her conflict with the main antagonist which is Jobu Tupaki. It is revealed that Jobu Tupaki is a variant of their daughter, Joy from the Alpha timeline, who is a relentless killer. Evelyn comes to understand Jobu Topaki's deep pain and reconciles with her daughter.

Inciting Incident: An alternate version of Waymond from a parallel universe reveals that Evelyn is the key to save the multiverse. She has to face many troubles in the multiverse.

Midpoint scene: There is a confrontation of Evelyn and Jobu Tupaki. Evelyn is determined to confront with her daughter to save the multiverse.

Climax scene: Confrontation of Evelyn and Jobu Tupaki. There are deep conversations and they are fighting with each other physically and emotionally.

The theme of the movie is about the importance of kindness, family, and finding fulfilment in life.


W3: Storyboard (Quiz)

A storyboard in filmmaking is a visual representation of a film, animation, or video game. It is made up of a series of illustrations or images displayed in sequence like a comic strip, benefits in pre-visualising the final film. 

Reading materials provided by Mr Martin:
There are two types of storyboard, Traditional and Thumbnail storyboards.
  • Traditional storyboards: Basic pencil sketches that include detailed information like arrows for camera movement, characters, props, etc.
  • Thumbnail storyboards: Don't have any writing in the image.
Figure 2.24 Example of Storyboard

Basic steps to make a storyboard: Identify key scenes in the script, Map out the key scenes, Add images or sketches, Describe what happens in each frame, Share it with your team, Reference it on the day.


W4: Asynchronous class materials reflection

Reading Materials provided by Mr Martin:
Production stages can be generally categorise into five distinct stages: Development- Pre-production - Production - Post-production - Distribution (Marketing). The three main stages are: 

Stage 1 — Pre-production
Planning stage of filmmaking, made all the necessary preparations before filming begins. (Writing scripts, Creating storyboards, Casting actors, Scouting locations, Designing sets, Hiring crew members)

Stage 2 — Production
Filming happens. Production team works together to capture all the footages needed, guided by the plans and preparations made during pre-production. This stage can be challenging as it involves coordinating a large team of people and managing a complex schedule.

Stage 3 — Post-production
Edit and assemble footages into the final product. (Cutting and arranging scenes, Adding music and sound effects, Colour grading, Visual effects). It is a time-consuming process, as it requires a lot of attention into details.

: Roles in Production Team

Reading Materials provided by Mr Martin:
Key Production crew members and their tasks
  1. Director, overseeing the entire production and ensuring that the creative vision for the project is realised.
  2. Producer, responsible for the logistical and financial aspects of the production.
  3. Cinematographer, also known as the director of photography (DP), is responsible for the visual aesthetic of the film.
  4. Production Designer, responsible for the overall visual design of the film, including the sets, costumes, and props.
  5. Sound Designer, responsible for the audio aspects of the film, including recording and editing dialogue, sound effects, and music.
  6. Editor, responsible for assembling the footage into a coherent and compelling story.

 W4: Production Stage (Quiz)

After that, we were instructed to complete a quiz to test our understanding of the topic.

Figure 2.25 Quiz Results


W4: Production Crew (Quiz)

After that, we were instructed to complete a quiz to test our understanding of the topic.

Figure 2.26 Quiz Results

 W5: Prepare for video shooting (Group Shooting)

In Photo Studio E1.01, me and my group mates are tasked to prepare filming for Project 2A. Our class are to separate into 3 groups. We need to choose our position based on the spreadsheet provided by Mr Martin.

Figure 2.27 Groupmates

Before the filming day, Mr Martin let us practice one of the scenes from the video.

Figure 2.28 Practicing one of the scenes


W6: Video Shooting: Everything, Everywhere All at Once

It was the filming week, we were told to bring some items and props in the document provided by Mr Martin. I had to act as the main character for the shoot last minute, as the original actor could not make it on filming day.

Figure 2.29 Outfit prepared by the team

Figure 2.30 Middle of the shoot check in

Figure 2.31 Behind of the scenes 1

Figure 2.32 Behind of the scenes 2


W7: Video Editing: Everything, Everywhere All At Once

After the filming day, we had to edit the video ourselves. I download the video and audio clips from Google Drive that created by our filming group's producer.

Figure 2.33 Video Clips

Figure 2.34 Editing Process


W7: Colour Correction, Colour Grading 

Mr Martin has tasked us a Google Form Quiz about Colour Correction and Colour Grading.

Figure 2.35 Quiz Result

W8: Independent Learning Week

This week is Independent Learning Week.


W9: Editing Exercise (Audio Editing)

In this week's exercise, we need to download 3 audios from the provided link (here). After that, we have to edit 3 audios using Adobe Audition by following the provided tutorials. (Practical Video / Practical Slides)

We are tasked to edit 5 sound effects:
  1. Phone call sound effect (Parametic equaliser)
  2. Muffled / Closet sound effect (Parametric equaliser)
  3. Space/Bathroom sound effect (Reverb)
  4. Cave sound effect (Reverb)
  5. Alien sound effect (Pitch shiffer)
But with the limited time in class,  we only managed to learn how to edit from 1 to 4. We had to learn how to edit alien sound effect ourselves.

Figure 2.36 All files used

Working Progress

1. Phone call sound effect (Parametric equalizer)

Figure 2.37 Phone call effect
                                                      
Figure 2.38 Audio 1 Final Phone call effect

2. Muffled / Closet sound effect (Parametric equalizer)

Figure 2.39 Muffled / Closet sound effect

Figure 2.40 Audio 2 Final Muffled / Closet sound effect

3. Space / Bathroom sound effect (Reverb)

Figure 2.41 Reverb - Space / Bathroom sound effect

Figure 2.42 Audio 3 Reverb - Space / Bathroom sound effect

4. Cave sound effect (Reverb)

Figure 2.43 Reverb - Cave sound effect

Figure 2.44 Audio 4 Reverb - Cave sound effect


W10: Stop Motion Trial Shoot

Figure 3.45 Stop Motion Trial Shoot Slides

In Photo Studio E1.01, me and my group mates are tasked to shoot 2 stop motion video examples given by Mr Martin. 

Figure 3.46 Assigned Groupmates for trial shoot

Figure 3.47 Photos took during trial shoot

Stop Motion Video Editing Practice

In today's practical class, we used the footages and JPEGs from Week 10's class and imported into Premiere Pro for editing. During the editing process, we were guided to change the preferences to 3 frames. 

Note: Week 12-14 would be at Photo Studio. 

Figure 3.48 Stop Motion Video Editing Practice

Figure 3.49 Stop Motion Trial Shot (Clay)

Figure 3.50 Stop Motion Trial Shoot (Paper cut)


REFLECTION

The exercises given were enjoyable, and I was able to learn new skills and tryout Adobe Premiere Pro and Adobe Audition.


←                 ↑                   
project 1                            top                               project 2